---
title: Profile Management
description: >-
Add comprehensive user profile management with customizable form fields and account information display using the
profile details plugin
sidebar:
order: 40
---
## Overview
This tutorial shows you how to add comprehensive user profile management to your **SuperTokens** authentication flows.
The guide makes use of the `plugins` functionality which provides a complete profile management interface with customizable form fields, account information display, and automatic third-party data integration.
The functionality integrates with the [progressive profiling plugin](/post-authentication/user-management/progressive-profiling) by default.
This allows you to:
- Gradually collect user information through the progressive profiling flow
- Display collected information in the profile details interface
- Keep both systems synchronized automatically
## Before you start
The profile details plugin supports only the `React` and `NodeJS` SDKs.
Support for other platforms is under active development.
You need to start from a working **SuperTokens** setup.
If you haven't done that already, please refer to the [Quickstart Guides](/quickstart).
## Steps
### 1. Initialize the backend plugin
#### 1.1 Install the plugin
```bash
npm install @supertokens-plugins/profile-details-nodejs
```
#### 1.2 Update your backend SDK configuration
The backend plugin exposes new endpoints which, in turn, get used by the frontend implementation.
```typescript
import SuperTokens from "supertokens-node";
import ProfileDetailsPlugin from "@supertokens-plugins/profile-details-nodejs";
SuperTokens.init({
appInfo: {
appName: "My App",
apiDomain: "https://api.example.com",
},
recipeList: [
// your recipes (Session recipe is required)
],
experimental: {
plugins: [
ProfileDetailsPlugin.init({
sections: [
{
id: "personal-details",
label: "Personal Information",
description: "Your personal details",
fields: [
{
id: "firstName",
label: "First Name",
type: "string",
required: true,
placeholder: "Enter your first name",
},
{
id: "lastName",
label: "Last Name",
type: "string",
required: true,
placeholder: "Enter your last name",
},
{
id: "company",
label: "Company",
type: "string",
required: false,
placeholder: "Enter your company name",
},
],
},
{
id: "preferences",
label: "Preferences",
description: "Customize your experience",
fields: [
{
id: "avatar",
label: "Profile Picture",
type: "image-url",
required: false,
placeholder: "https://example.com/avatar.jpg",
},
{
id: "theme",
label: "Preferred Theme",
type: "select",
required: false,
options: [
{ value: "light", label: "Light" },
{ value: "dark", label: "Dark" },
{ value: "auto", label: "Auto" },
],
defaultValue: "auto",
},
],
},
],
registerSectionsForProgressiveProfiling: true, // Optional: defaults to true
}),
],
},
});
```
##### Supported field types
The plugin supports the following field types:
| Field Type | Description | Value Type | Example Use Case |
|------------|-------------|------------|------------------|
| `string` | Single-line text input | `string` | Name, title, company |
| `text` | Multi-line text area | `string` | Bio, description, comments |
| `number` | Numeric input | `number` | Age, salary, experience |
| `boolean` | Checkbox input | `boolean` | Newsletter subscription |
| `toggle` | Toggle switch | `boolean` | Feature preferences |
| `email` | Email input with validation | `string` | Contact email |
| `phone` | Phone number input | `string` | Contact number |
| `date` | Date picker | `string` (ISO 8601 format) | Birth date, start date |
| `select` | Dropdown selection | `string` | Country, department, role |
| `multiselect` | Multiple selection dropdown | `string[]` | Skills, interests, languages |
| `password` | Password input | `string` | API keys, secure tokens |
| `url` | URL input with validation | `string` | Website, social profiles |
| `image-url` | Image URL input with preview | `string` | Profile picture, logo |
##### Third-party data integration
The plugin automatically integrates with third-party authentication providers to populate profile fields.
When users sign in using external providers, the plugin maps provider data to profile fields (if the fields are configured):
- `firstName`: Maps from `name`, `given_name`, or `first_name`
- `lastName`: Maps from `family_name` or `last_name`
- `avatar`: Maps from `picture` or `avatar_url`
:::info
You can customize how third-party data maps to your profile fields by overriding the function `getFieldValueFromThirdPartyUserInfo`.
```typescript check=false reason="Requires surrounding application context"
import ProfileDetailsPlugin from "@supertokens-plugins/profile-details-nodejs";
SuperTokens.init({
// ... other config
experimental: {
plugins: [
ProfileDetailsPlugin.init({
override: (oI) => ({
...oI,
getFieldValueFromThirdPartyUserInfo: (providerId, field, rawUserInfoFromProvider, profile) => {
return rawUserInfoFromProvider[field.id];
},
}),
}),
],
},
});
```
:::
### 2. Initialize the frontend plugin
#### 2.1 Install the plugin
```bash
npm install @supertokens-plugins/profile-details-react
```
#### 2.2 Update your frontend SDK configuration
Initialize the frontend plugin in your existing configuration.
With the following setup the `/user/profile` path renders the profile details page.
```typescript
import SuperTokens from "supertokens-auth-react";
import ProfileDetailsPlugin from "@supertokens-plugins/profile-details-react";
SuperTokens.init({
appInfo: {
appName: "My App",
apiDomain: "https://api.example.com",
websiteDomain: "https://example.com",
},
recipeList: [
// your recipes
],
experimental: {
plugins: [ProfileDetailsPlugin.init()],
},
});
```
:::info[The user profile page gets rendered by default on the `/user/profile` path.]
If you want to change the path, you have to initialize the `profile-base-react` plugin with the `profilePagePath` option.
```typescript
import SuperTokens from "supertokens-auth-react";
import ProfileBasePlugin from "@supertokens-plugins/profile-base-react";
import ProfileDetailsPlugin from "@supertokens-plugins/profile-details-react";
SuperTokens.init({
appInfo: {
appName: "My App",
apiDomain: "https://api.example.com",
websiteDomain: "https://example.com",
},
recipeList: [
// your recipes
],
experimental: {
plugins: [
ProfileBasePlugin.init({
profilePagePath: "/user/profile",
}),
ProfileDetailsPlugin.init(),
],
},
});
```
:::
### 3. Test the implementation
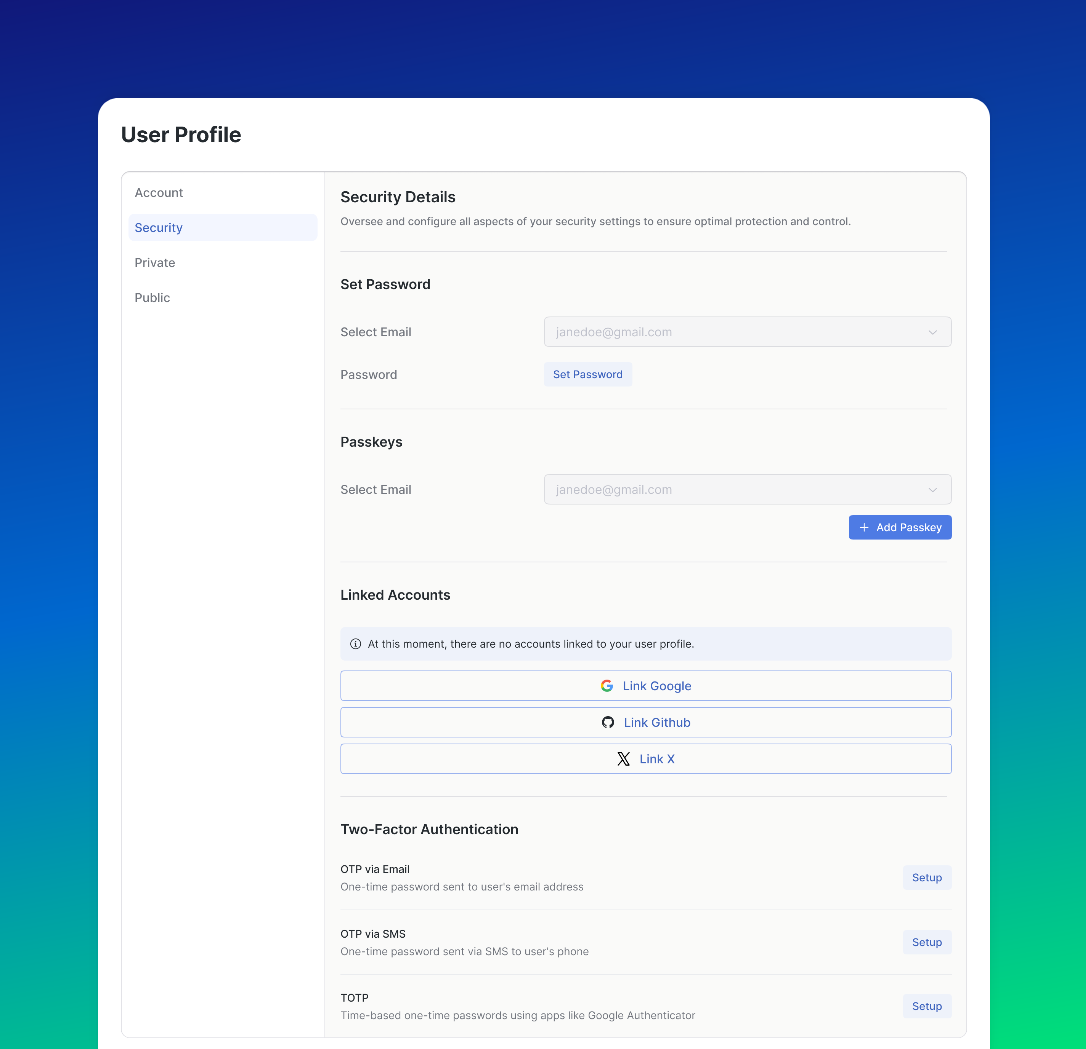
Authenticate and then visit the `/user/profile` path.
You should see the new interface that renders the profile data.
## Customization
### Custom field components
To add custom rendering behavior for fields you have to pass an override during plugin initialization.
```typescript check=false reason="Requires surrounding framework application context"
import ProfileDetailsPlugin from "@supertokens-plugins/profile-details-react";
import { CustomStringInput, CustomStringView } from "./your-custom-components";
SuperTokens.init({
// ... other config
experimental: {
plugins: [
ProfileDetailsPlugin.init({
override: (oI) => ({
...oI,
fieldInputComponentMap: (originalMap) => ({
...originalMap,
string: CustomStringInput,
}),
fieldViewComponentMap: (originalMap) => ({
...originalMap,
string: CustomStringView,
}),
}),
}),
],
},
});
```
### Custom user interface
To create your own UI you can use the `usePluginContext` hook.
It exposes an interface which you can use to call the endpoints exposed by the backend plugin.
```tsx check=false reason="Requires surrounding application context"
import { usePluginContext } from "@supertokens-plugins/profile-details-react";
function CustomProfileComponent() {
const { api, t, fieldInputComponentMap } = usePluginContext();
const [profile, setProfile] = useState(null);
const handleGetDetails = async () => {
const result = await api.getDetails();
if (result.status === "OK") {
setProfile(result.profile);
}
};
const handleUpdateProfile = async (data) => {
const result = await api.updateProfile({ data });
if (result.status === "OK") {
console.log("Profile updated successfully");
}
};
return (
{t("PL_CD_SECTION_ACCOUNT_LABEL")}
{/* Your custom form components */}
);
}
```
## Next steps
Besides profile details management, you can also explore other user management features:
Gradually collect user information through customizable forms.
Implement user banning functionality to restrict access.
Implement role-based access control for your users.
General information on how plugins work.
 ## Customization
### Custom field components
To add custom rendering behavior for fields you have to pass an override during plugin initialization.
```typescript check=false reason="Requires surrounding framework application context"
import ProfileDetailsPlugin from "@supertokens-plugins/profile-details-react";
import { CustomStringInput, CustomStringView } from "./your-custom-components";
SuperTokens.init({
// ... other config
experimental: {
plugins: [
ProfileDetailsPlugin.init({
override: (oI) => ({
...oI,
fieldInputComponentMap: (originalMap) => ({
...originalMap,
string: CustomStringInput,
}),
fieldViewComponentMap: (originalMap) => ({
...originalMap,
string: CustomStringView,
}),
}),
}),
],
},
});
```
### Custom user interface
To create your own UI you can use the `usePluginContext` hook.
It exposes an interface which you can use to call the endpoints exposed by the backend plugin.
```tsx check=false reason="Requires surrounding application context"
import { usePluginContext } from "@supertokens-plugins/profile-details-react";
function CustomProfileComponent() {
const { api, t, fieldInputComponentMap } = usePluginContext();
const [profile, setProfile] = useState(null);
const handleGetDetails = async () => {
const result = await api.getDetails();
if (result.status === "OK") {
setProfile(result.profile);
}
};
const handleUpdateProfile = async (data) => {
const result = await api.updateProfile({ data });
if (result.status === "OK") {
console.log("Profile updated successfully");
}
};
return (
## Customization
### Custom field components
To add custom rendering behavior for fields you have to pass an override during plugin initialization.
```typescript check=false reason="Requires surrounding framework application context"
import ProfileDetailsPlugin from "@supertokens-plugins/profile-details-react";
import { CustomStringInput, CustomStringView } from "./your-custom-components";
SuperTokens.init({
// ... other config
experimental: {
plugins: [
ProfileDetailsPlugin.init({
override: (oI) => ({
...oI,
fieldInputComponentMap: (originalMap) => ({
...originalMap,
string: CustomStringInput,
}),
fieldViewComponentMap: (originalMap) => ({
...originalMap,
string: CustomStringView,
}),
}),
}),
],
},
});
```
### Custom user interface
To create your own UI you can use the `usePluginContext` hook.
It exposes an interface which you can use to call the endpoints exposed by the backend plugin.
```tsx check=false reason="Requires surrounding application context"
import { usePluginContext } from "@supertokens-plugins/profile-details-react";
function CustomProfileComponent() {
const { api, t, fieldInputComponentMap } = usePluginContext();
const [profile, setProfile] = useState(null);
const handleGetDetails = async () => {
const result = await api.getDetails();
if (result.status === "OK") {
setProfile(result.profile);
}
};
const handleUpdateProfile = async (data) => {
const result = await api.updateProfile({ data });
if (result.status === "OK") {
console.log("Profile updated successfully");
}
};
return (