Multiple frontend domains with a common backend
Implement OAuth2 authentication for multiple frontend domains using a shared backend service.
Overview
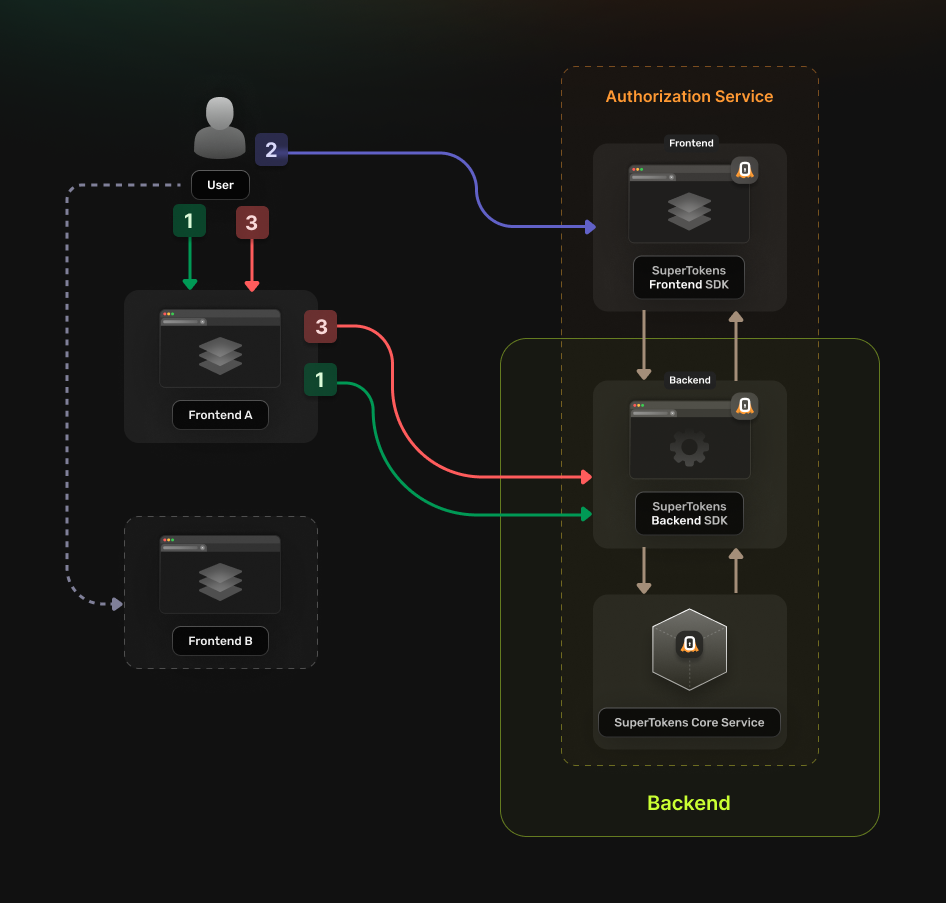
Use this guide when multiple frontend applications call the same backend service. In this topology, each browser application exchanges its own authorization code, so each is a public OAuth client. The authentication flow works in the following way:
The User accesses the frontend application:
- The application
frontendredirects the user to the Authorization Service backend, using the authorize URL.- The Authorization Service backend redirects the user to the login UI.
The User completes the login attempt:
- The Authorization Service backend redirects the user to the
callback URL.
The user accesses the callback URL:
- The frontend verifies the callback
state, then exchanges the Authorization Code with its PKCE code verifier. It never uses a client secret.
Before you start
Steps
1. Enable the Unified Login feature
Go to the SuperTokens.com SaaS Dashboard, select the relevant Managed deployment, and open Features. Enable Unified Login. Changes are saved automatically.
2. Create the OAuth2 Clients
For each frontend application, create a separate OAuth2 client.
Call the SuperTokens Core API from a trusted administrative environment. The examples create public clients: tokenEndpointAuthMethod is none, no secret is issued or shipped, and allowedCorsOrigins contains only the exact origin that may call the token endpoint. Each application must use authorization code with PKCE.
curl --location --request POST '<CORE_API_ENDPOINT>/recipe/oauth/clients' \
     --header 'api-key: <YOUR_API_KEY>' \
     --header 'Content-Type: application/json; charset=utf-8' \
     --data '
    {
      "clientName": "<YOUR_CLIENT_NAME>",
      "responseTypes": ["code"],
      "grantTypes": ["authorization_code", "refresh_token"],
      "tokenEndpointAuthMethod": "none",
      "allowedCorsOrigins": ["https://<YOUR_APPLICATION_DOMAIN>"],
      "audience": ["<YOUR_API_DOMAIN>"],
      "scope": "offline_access <custom_scope_1> <custom_scope_2>",
      "redirectUris": ["https://<YOUR_APPLICATION_DOMAIN>/oauth/callback"]
    }
'
const BASE_URL = "<CORE_API_ENDPOINT>";
const API_KEY = "<YOUR_API_KEY>";
const url = `${BASE_URL}/recipe/oauth/clients`;
const options = {
method: "POST",
headers: {
"api-key": API_KEY,
"Content-Type": "application/json; charset=utf-8",
},
body: JSON.stringify({
clientName: "<YOUR_CLIENT_NAME>",
responseTypes: ["code"],
grantTypes: ["authorization_code", "refresh_token"],
tokenEndpointAuthMethod: "none",
allowedCorsOrigins: ["https://<YOUR_APPLICATION_DOMAIN>"],
audience: ["<YOUR_API_DOMAIN>"],
scope: "offline_access <custom_scope_1> <custom_scope_2>",
redirectUris: ["https://<YOUR_APPLICATION_DOMAIN>/oauth/callback"],
}),
};
fetch(url, options)
.then((response) => response.json())
.then((json) => console.log(json))
.catch((err) => console.error(err));
import (
  "fmt"
  "net/http"
  "strings"
  "io"
)

func main() {
  baseUrl := "<CORE_API_ENDPOINT>"
  apiKey := "<YOUR_API_KEY>"
  url := fmt.Sprintf("%s/recipe/oauth/clients", baseUrl)
  payload := `{
    "clientName": "<YOUR_CLIENT_NAME>",
    "responseTypes": ["code"],
    "grantTypes": ["authorization_code", "refresh_token"],
    "tokenEndpointAuthMethod": "none",
    "allowedCorsOrigins": ["https://<YOUR_APPLICATION_DOMAIN>"],
    "audience": ["<YOUR_API_DOMAIN>"],
    "scope": "offline_access <custom_scope_1> <custom_scope_2>",
    "redirectUris": ["https://<YOUR_APPLICATION_DOMAIN>/oauth/callback"]
  }`

  req, _ := http.NewRequest("POST", url, strings.NewReader(payload))

  req.Header.Add("accept", "application/json")
  req.Header.Add("api-key", apiKey)
  req.Header.Add("content-type", "application/json")

  res, _ := http.DefaultClient.Do(req)

  defer res.Body.Close()
  body, _ := io.ReadAll(res.Body)

  fmt.Println(string(body))
}
import requests
from typing import Dict, Any
BASE_URL = "<CORE_API_ENDPOINT>"
API_KEY = "<YOUR_API_KEY>"
url = f"{BASE_URL}/recipe/oauth/clients"
payload: Dict[str, Any] ={
"clientName": "<YOUR_CLIENT_NAME>",
"responseTypes": ["code"],
"grantTypes": ["authorization_code", "refresh_token"],
"tokenEndpointAuthMethod": "none",
"allowedCorsOrigins": ["https://<YOUR_APPLICATION_DOMAIN>"],
"audience": ["<YOUR_API_DOMAIN>"],
"scope": "offline_access <custom_scope_1> <custom_scope_2>",
"redirectUris": ["https://<YOUR_APPLICATION_DOMAIN>/oauth/callback"]
}
headers = {
"api-key": API_KEY,
"Content-Type": "application/json",
}
response = requests.post(url, json=payload, headers=headers)
print(response.json())Creates an OAuth2 client
Authorization: Set the api-key header to the value of your SuperTokens Core API key.
Request
Body Schema
| Name | Type | Description | Required | Default Value |
|---|---|---|---|---|
clientName |
string |
A human-readable name of the client used for identification. | Yes | - |
grantTypes |
array of GrantType |
The grant types that the Client uses. | Yes | - |
redirectUris |
array of string |
Exact redirect URIs registered for the client. Wildcards are not supported. | Yes | - |
allowedCorsOrigins |
array of string |
Exact browser origins allowed to call OAuth endpoints. | No | - |
audience |
array of string |
Resource-server identifiers allowed in access tokens. | No | - |
scope |
string |
String containing a space-separated list of scope values (as described in Section 3.3 of OAuth 2.0 [RFC6749]) that the client can use when requesting access tokens. Include the offline_access scope to exchange OAuth2 Refresh Tokens for OAuth2 Access Tokens |
No | “” |
responseTypes |
array of ResponseType |
The types of responses your client expects from the Authorization Server | No | - |
tokenEndpointAuthMethod |
enum("client_secret_basic", "client_secret_post", "private_key_jwt", "none") |
The requested client authentication method | No | client_secret_basic |
authorizationCodeGrantAccessTokenLifespan |
Time Duration |
OAuth2 Access Token lifespan when using the Authorization Code grant flow. | No | "1h" |
authorizationCodeGrantIdTokenLifespan |
Time Duration |
OAuth2 ID Token lifespan when using the Authorization Code grant flow. | No | "1h" |
authorizationCodeGrantRefreshTokenLifespan |
Time Duration |
OAuth2 Refresh Token lifespan when using the Authorization Code grant flow. | If refreshTokenGrantRefreshTokenLifespan is also set |
"30d" |
refreshTokenGrantRefreshTokenLifespan |
Time Duration |
OAuth2 Refresh Token lifespan when using the Refresh Token grant flow. Must match authorizationCodeGrantRefreshTokenLifespan. |
If authorizationCodeGrantRefreshTokenLifespan is also set |
"30d" |
clientCredentialsGrantAccessTokenLifespan |
Time Duration |
OAuth2 Access Token lifespan when using the Client Credentials grant flow. | No | "1h" |
enableRefreshTokenRotation |
boolean |
Indicates that the refresh token is a one-time use. Set it to false to disable refresh token rotation. |
No | true |
GrantType
authorization_code: allows exchanging the Authorization Code for an OAuth2 Access Token.refresh_token: allows exchanging the OAuth2 Refresh Token for an OAuth2 Access Token.client_credentials: allows the client to directly request an OAuth2 Access Token by authenticating itself with the Authorization Server using its own client credentials.
TokenEndpointAuthMethod
client_secret_basic: uses the HTTP Basic Authentication scheme to authenticate the client.client_secret_post: uses the HTTPPOSTAuthentication scheme to authenticate the client.private_key_jwt: uses JSON Web Tokens (JWT) to authenticate the client.none: indicates that the process of obtaining an OAuth2 Access Token does not use the client secret. Used for public clients (native apps or mobile apps).
ResponseType
code: Indicates that the Client receives an Authorization Code that it exchanges for an OAuth2 Access Token.id_token: Indicates that the Client expects an ID Token.
Time Duration
A string value that signifies time duration in milliseconds, seconds, minutes, or hours: "2000ms", "60s", "30m", "1h".
Example
curl -X POST <CORE_API_ENDPOINT>/recipe/oauth/clients \
  -H "Content-Type: application/json" \
  -H "api-key: <YOUR_API_KEY>" \
  -d '{
      "clientName": "<YOUR_CLIENT_NAME>",
      "responseTypes": ["code"],
      "grantTypes": ["authorization_code", "refresh_token"],
      "tokenEndpointAuthMethod": "none",
      "allowedCorsOrigins": ["https://<YOUR_APPLICATION_DOMAIN>"],
      "audience": ["<YOUR_API_DOMAIN>"],
      "scope": "offline_access <custom_scope_1> <custom_scope_2>",
      "redirectUris": ["https://<YOUR_APPLICATION_DOMAIN>/oauth/callback"]
    }'
Response
200
The client has been successfully created.
Relevant response fields
The response includes the persisted client configuration, including the fields below.
| Property | Type | Description |
|---|---|---|
clientName |
string |
The name of the client. |
clientId |
string |
Unique identifier for the client. |
clientSecret |
string |
Client secret for a confidential client. Omitted for a public client. Treat it as a credential and keep it on a trusted backend. |
redirectUris |
array of string |
The URLs used for redirection. |
audience |
array of string |
Value used to identify for whom a token is issued. The created client can generate access token only for the specified audiences. |
scope |
string |
A space-separated string of scopes that the client can request. |
responseTypes |
array of string |
Registered response types. |
grantTypes |
array of string |
Registered grant types. |
tokenEndpointAuthMethod |
string |
Token endpoint authentication method. |
allowedCorsOrigins |
array of string |
Exact browser origins allowed to call OAuth endpoints. |
enableRefreshTokenRotation |
boolean |
Whether refresh token rotation is enabled. |
Example
{
  "clientName": "<YOUR_CLIENT_NAME>",
  "clientId": "<CLIENT_ID>",
  "tokenEndpointAuthMethod": "none",
  "allowedCorsOrigins": ["https://<YOUR_APPLICATION_DOMAIN>"],
  "audience": ["<YOUR_API_DOMAIN>"],
  "redirectUris": ["https://<YOUR_APPLICATION_DOMAIN>/oauth/callback"],
  "scope": "offline_access <custom_scope_1> <custom_scope_2>"
}3. Set up the Authorization Service Backend
3.1 Initialize the OAuth2 recipe
Update the supertokens.init call to include the new recipe.
import supertokens from "supertokens-node";
import EmailPassword from "supertokens-node/recipe/emailpassword";
import OAuth2Provider from "supertokens-node/recipe/oauth2provider";

supertokens.init({
  supertokens: {
    connectionURI: "...",
    apiKey: "...",
  },
  appInfo: {
    appName: "...",
    apiDomain: "...",
    websiteDomain: "...",
  },
  recipeList: [EmailPassword.init(), OAuth2Provider.init()],
});
from supertokens_python import init, InputAppInfo, SupertokensConfig
from supertokens_python.recipe import emailpassword, oauth2provider
init(
app_info=InputAppInfo(
app_name="...",
api_domain="...",
website_domain="...",
),
framework="fastapi",
supertokens_config=SupertokensConfig(
connection_uri="...",
api_key="..."
),
recipe_list=[
emailpassword.init(),
oauth2provider.init(),
],
)3.2 Update the CORS configuration
Set up the Backend API to allow requests from all the frontend domains.
import express from "express";
import cors from "cors";
import supertokens from "supertokens-node";
import { middleware } from "supertokens-node/framework/express";

const app = express();

// Add your actual frontend domains here
const allowedOrigins = ["<YOUR_WEBSITE_DOMAIN>", "<CLIENT_DOMAIN_1>", "<CLIENT_DOMAIN_2>"];

app.use(
  cors({
    origin: allowedOrigins,
    allowedHeaders: ["content-type", ...supertokens.getAllCORSHeaders()],
    credentials: true,
  }),
);
from supertokens_python import get_all_cors_headers
from fastapi import FastAPI
from starlette.middleware.cors import CORSMiddleware
from supertokens_python.framework.fastapi import get_middleware
app = FastAPI()
app.add_middleware(get_middleware())
app.add_middleware(
CORSMiddleware,
allow_origins=[
"<YOUR_WEBSITE_DOMAIN>", "<CLIENT_DOMAIN_1>", "<CLIENT_DOMAIN_2>"
],
allow_credentials=True,
allow_methods=["GET", "PUT", "POST", "DELETE", "OPTIONS", "PATCH"],
allow_headers=["Content-Type"] + get_all_cors_headers(),
)3.3 Implement a custom session verification function
Given that the backend, the Authorization Server, also acts as a Resource Server you have to account for this in the session verification process.
This is necessary because the flow uses two types of tokens:
- SuperTokens Session Access Token: Used during the login and logout.
- OAuth2 Access Token: Used to access protected resources and perform actions that need authorization.
Hence the logic should distinguish between these two and prevent errors.
Configure EXPECTED_ISSUER from the authorization server discovery document and compare it exactly. The released OAuth2Provider validators verify the signature and expiry; the examples also require the configured client ID, audience, and scopes. checkDatabase/check_database additionally rejects revoked or otherwise inactive tokens.
Here is an example of how to implement this in the context of an Express API:
import express, { NextFunction, Request, Response } from "express";
import OAuth2Provider from "supertokens-node/recipe/oauth2provider";
import Session from "supertokens-node/recipe/session";

const EXPECTED_CLIENT_ID = "<CLIENT_ID>";
const EXPECTED_AUDIENCE = "<YOUR_API_DOMAIN>";
const EXPECTED_ISSUER = "<YOUR_CONFIGURED_ISSUER>"; // Usually <YOUR_API_DOMAIN>/auth
const REQUIRED_SCOPES = ["<CUSTOM_SCOPE>"];

interface RequestWithUserId extends Request {
  userId?: string;
}

function getBearerToken(req: Request): string {
  const authorization = req.header("authorization");
  if (authorization === undefined || !authorization.startsWith("Bearer ")) {
    throw new Error("Missing bearer token");
  }
  return authorization.slice("Bearer ".length);
}

async function verifySession(req: RequestWithUserId, res: Response, next: NextFunction) {
  try {
    let session;
    try {
      session = await Session.getSession(req, res, { sessionRequired: false });
    } catch (error) {
      if (
        !Session.Error.isErrorFromSuperTokens(error) ||
        (error.type !== Session.Error.TRY_REFRESH_TOKEN && error.type !== Session.Error.UNAUTHORISED)
      ) {
        throw error;
      }
    }
    if (session !== undefined) {
      req.userId = session.getUserId();
      return next();
    }

    const validation = await OAuth2Provider.validateOAuth2AccessToken(
      getBearerToken(req),
      {
        clientId: EXPECTED_CLIENT_ID,
        audience: EXPECTED_AUDIENCE,
        scopes: REQUIRED_SCOPES,
      },
      true,
    );

    if (validation.payload.iss !== EXPECTED_ISSUER || typeof validation.payload.sub !== "string") {
      throw new Error("Unexpected OAuth token issuer or subject");
    }

    req.userId = validation.payload.sub;
    return next();
  } catch (error) {
    return next(error);
  }
}

const app = express();
app.get("/protected", verifySession, async (req, res) => {
  // Custom logic
});
from fastapi.requests import Request
from supertokens_python.recipe.oauth2provider.interfaces import (
OAuth2TokenValidationRequirements,
)
from supertokens_python.recipe.oauth2provider.syncio import (
validate_oauth2_access_token,
)
from supertokens_python.recipe.session.exceptions import (
SuperTokensSessionError,
TryRefreshTokenError,
UnauthorisedError,
)
from supertokens_python.recipe.session.syncio import get_session
EXPECTED_CLIENT_ID = "<CLIENT_ID>"
EXPECTED_AUDIENCE = "<YOUR_API_DOMAIN>"
EXPECTED_ISSUER = "<YOUR_CONFIGURED_ISSUER>" # Usually <YOUR_API_DOMAIN>/auth
REQUIRED_SCOPES = ["<CUSTOM_SCOPE>"]
def get_bearer_token(request: Request) -> str:
authorization = request.headers.get("authorization")
if authorization is None or not authorization.startswith("Bearer "):
raise ValueError("Missing bearer token")
return authorization.removeprefix("Bearer ")
def verify_session(request: Request) -> str:
session = None
try:
session = get_session(request, session_required=False)
except SuperTokensSessionError as error:
if not isinstance(error, (TryRefreshTokenError, UnauthorisedError)):
raise
if session is not None:
return session.get_user_id()
validation = validate_oauth2_access_token(
get_bearer_token(request),
OAuth2TokenValidationRequirements(
client_id=EXPECTED_CLIENT_ID,
audience=EXPECTED_AUDIENCE,
scopes=REQUIRED_SCOPES,
),
check_database=True,
)
payload = validation.payload
if payload.get("iss") != EXPECTED_ISSUER or not isinstance(payload.get("sub"), str):
raise ValueError("Unexpected OAuth token issuer or subject")
return payload["sub"]For more information on how to verify the OAuth2 Access Tokens, please check the separate guide.
4. Configure the Authorization Service Frontend
4.1 Initialize the recipe
Add the import statement for the new recipe and update the list of recipes to also include the new initialization.
Update the AuthComponent to include the OAuth2Provider recipe.
You need to add a new item in the recipeList array.
Update the AuthView component to include the OAuth2Provider recipe.
You need to add a new item in the recipeList array, inside the supertokensUIInit call.
import OAuth2Provider from "supertokens-auth-react/recipe/oauth2provider";
import EmailPassword from "supertokens-auth-react/recipe/emailpassword";
import SuperTokens from "supertokens-auth-react";

SuperTokens.init({
  appInfo: {
    appName: "...",
    apiDomain: "...",
    websiteDomain: "...",
  },
  recipeList: [EmailPassword.init(), OAuth2Provider.init()],
});
import { init as supertokensUIInit } from "supertokens-auth-react";
import supertokensUIOAuth2Provider from "supertokens-auth-react/recipe/oauth2provider";
import { Component, OnDestroy, AfterViewInit, Renderer2, Inject } from "@angular/core";
import { DOCUMENT } from "@angular/common";
@Component({
selector: "app-auth",
template: '<div id="supertokensui"></div>',
})
export class AuthComponent implements OnDestroy, AfterViewInit {
constructor(
private renderer: Renderer2,
@Inject(DOCUMENT) private document: Document,
) {}
ngAfterViewInit() {
this.loadScript("https://cdn.jsdelivr.net/gh/supertokens/prebuiltui@vX.Y.Z/build/static/js/main.test.js");
}
ngOnDestroy() {
// Remove the script when the component is destroyed
const script = this.document.getElementById("supertokens-script");
if (script) {
script.remove();
}
}
private loadScript(src: string) {
const script = this.renderer.createElement("script");
script.type = "text/javascript";
script.src = src;
script.id = "supertokens-script";
script.onload = () => {
supertokensUIInit({
appInfo: {
appName: "<YOUR_APP_NAME>",
apiDomain: "<YOUR_API_DOMAIN>",
websiteDomain: "<YOUR_WEBSITE_DOMAIN>",
apiBasePath: "/auth",
websiteBasePath: "/auth",
},
recipeList: [
// Don't forget to also include the other recipes that you are already using
supertokensUIOAuth2Provider.init(),
],
});
};
this.renderer.appendChild(this.document.body, script);
}
}import {init as supertokensUIInit} from "supertokens-auth-react"; import supertokensUIOAuth2Provider from
"supertokens-auth-react/recipe/oauth2provider";
<script lang="ts">
import { defineComponent, onMounted, onUnmounted } from "vue";
export default defineComponent({
setup() {
const loadScript = (src: string) => {
const script = document.createElement("script");
script.type = "text/javascript";
script.src = src;
script.id = "supertokens-script";
script.onload = () => {
supertokensUIInit({
appInfo: {
appName: "<YOUR_APP_NAME>",
apiDomain: "<YOUR_API_DOMAIN>",
websiteDomain: "<YOUR_WEBSITE_DOMAIN>",
apiBasePath: "/auth",
websiteBasePath: "/auth",
},
recipeList: [
// Don't forget to also include the other recipes that you are already using
supertokensUIOAuth2Provider.init(),
],
});
};
document.body.appendChild(script);
};
onMounted(() => {
loadScript("https://cdn.jsdelivr.net/gh/supertokens/prebuiltui@vX.Y.Z/build/static/js/main.test.js");
});
onUnmounted(() => {
const script = document.getElementById("supertokens-script");
if (script) {
script.remove();
}
});
},
});
</script>
<template>
<div id="supertokensui" />
</template>import React from "react";
import { BrowserRouter, Routes } from "react-router-dom";
import SuperTokens, { SuperTokensWrapper } from "supertokens-auth-react";
import { getSuperTokensRoutesForReactRouterDom } from "supertokens-auth-react/ui";
import { OAuth2ProviderPreBuiltUI } from "supertokens-auth-react/recipe/oauth2provider/prebuiltui";
import { EmailPasswordPreBuiltUI } from "supertokens-auth-react/recipe/emailpassword/prebuiltui";
import * as reactRouterDom from "react-router-dom";
class App extends React.Component {
render() {
return (
<SuperTokensWrapper>
<BrowserRouter>
<Routes>
{/*This renders the login UI on the /auth route*/}
{getSuperTokensRoutesForReactRouterDom(reactRouterDom, [EmailPasswordPreBuiltUI, OAuth2ProviderPreBuiltUI])}
{/*Your app routes*/}
</Routes>
</BrowserRouter>
</SuperTokensWrapper>
);
}
}import React from "react";
import { OAuth2ProviderPreBuiltUI } from "supertokens-auth-react/recipe/oauth2provider/prebuiltui";
import { EmailPasswordPreBuiltUI } from "supertokens-auth-react/recipe/emailpassword/prebuiltui";
import SuperTokens, { SuperTokensWrapper } from "supertokens-auth-react";
import { canHandleRoute, getRoutingComponent } from "supertokens-auth-react/ui";
class App extends React.Component {
render() {
if (canHandleRoute([EmailPasswordPreBuiltUI, OAuth2ProviderPreBuiltUI])) {
// This renders the login UI on the /auth route
return getRoutingComponent([EmailPasswordPreBuiltUI, OAuth2ProviderPreBuiltUI]);
}
return <SuperTokensWrapper>{/*Your app*/}</SuperTokensWrapper>;
}
}4.2 Disable network interceptors
The Authorization Service Frontend that you are configuring makes use of two types of access tokens:
- SuperTokens Session Access Token: Used only during the login flow to keep track of the authentication state.
- OAuth2 Access Token: Returned after a successful login attempt. It can then access protected resources.
By default, the SuperTokens frontend SDK intercepts all the network requests sent to your Backend API and adjusts them based on the SuperTokens Session Tokens. This allows operations, such as automatic token refreshing or adding authorization headers, without needing to configure anything else.
Given that in the scenario you are implementing, the OAuth2 Access Tokens serve authorization purposes.
The automatic request interception causes conflicts.
To prevent this, you need to override the shouldDoInterceptionBasedOnUrl function in the Session.init call.
You need to make changes to the auth route configuration, as well as to the supertokens-web-js SDK configuration at the root of your application:
This change is in your auth route configuration.
You need to make changes to the auth route configuration, as well as to the supertokens-web-js SDK configuration at the root of your application:
This change is in your auth route configuration.
import Session from "supertokens-auth-react/recipe/session";

Session.init({
  override: {
    functions: (oI) => {
      return {
        ...oI,
        shouldDoInterceptionBasedOnUrl: (url, apiDomain, sessionTokenBackendDomain) => {
          try {
            let urlObj = new URL(url);
            // Interception should be done only for routes that need the SuperTokens Session Tokens
            const isAuthApiRoute = urlObj.pathname.startsWith("/auth");
            const isOAuth2ApiRoute = urlObj.pathname.startsWith("/auth/oauth");
            if (!isAuthApiRoute || isOAuth2ApiRoute) {
              return false;
            }
          } catch (ignored) {}
          return oI.shouldDoInterceptionBasedOnUrl(url, apiDomain, sessionTokenBackendDomain);
        },
      };
    },
  },
});
// this goes in the auth route config of your frontend app (once the pre-built UI script has been loaded)
import supertokensUISession from "supertokens-auth-react/recipe/session";
supertokensUISession.init({
override: {
functions: (oI) => {
return {
...oI,
shouldDoInterceptionBasedOnUrl: (url, apiDomain, sessionTokenBackendDomain) => {
try {
let urlObj = new URL(url);
const isAuthApiRoute = urlObj.pathname.startsWith("/auth");
const isOAuth2ApiRoute = urlObj.pathname.startsWith("/auth/oauth");
if (!isAuthApiRoute || isOAuth2ApiRoute) {
return false;
}
} catch (ignored) {}
return oI.shouldDoInterceptionBasedOnUrl(url, apiDomain, sessionTokenBackendDomain);
},
};
},
},
});// this goes in the auth route config of your frontend app (once the pre-built UI script has been loaded)
import supertokensUISession from "supertokens-auth-react/recipe/session";
supertokensUISession.init({
override: {
functions: (oI) => {
return {
...oI,
shouldDoInterceptionBasedOnUrl: (url, apiDomain, sessionTokenBackendDomain) => {
try {
let urlObj = new URL(url);
const isAuthApiRoute = urlObj.pathname.startsWith("/auth");
const isOAuth2ApiRoute = urlObj.pathname.startsWith("/auth/oauth");
if (!isAuthApiRoute || isOAuth2ApiRoute) {
return false;
}
} catch (ignored) {}
return oI.shouldDoInterceptionBasedOnUrl(url, apiDomain, sessionTokenBackendDomain);
},
};
},
},
});This change goes in the supertokens-web-js SDK configuration at the root of your application:
This change goes in the supertokens-web-js SDK configuration at the root of your application:
import Session from "supertokens-web-js/recipe/session";

Session.init({
  override: {
    functions: (oI) => {
      return {
        ...oI,
        shouldDoInterceptionBasedOnUrl: (url, apiDomain, sessionTokenBackendDomain) => {
          try {
            let urlObj = new URL(url);
            const isAuthApiRoute = urlObj.pathname.startsWith("/auth");
            const isOAuth2ApiRoute = urlObj.pathname.startsWith("/auth/oauth");
            if (!isAuthApiRoute || isOAuth2ApiRoute) {
              return false;
            }
          } catch (ignored) {}
          return oI.shouldDoInterceptionBasedOnUrl(url, apiDomain, sessionTokenBackendDomain);
        },
      };
    },
  },
});
import Session from "supertokens-web-js/recipe/session";
Session.init({
override: {
functions: (oI) => {
return {
...oI,
shouldDoInterceptionBasedOnUrl: (url, apiDomain, sessionTokenBackendDomain) => {
try {
let urlObj = new URL(url);
const isAuthApiRoute = urlObj.pathname.startsWith("/auth");
const isOAuth2ApiRoute = urlObj.pathname.startsWith("/auth/oauth");
if (!isAuthApiRoute || isOAuth2ApiRoute) {
return false;
}
} catch (ignored) {}
return oI.shouldDoInterceptionBasedOnUrl(url, apiDomain, sessionTokenBackendDomain);
},
};
},
},
});The snippets retain interception for SuperTokens authentication routes under /auth, but explicitly exclude /auth/oauth. OAuth token, introspection, and related protocol requests must not receive SuperTokens session headers or automatic session refresh behavior.
For the other routes, you have full control on how you want to attach the OAuth2 Access Tokens to the API calls.
The user interface that you are going to build should respect this flow:
A user accesses your application and tries to login.
It’s up to you how you want to handle this. They can click a button to login or you can directly start the login flow.
They get redirected to the Authorization Service Backend
A OAuth2/OpenID Connect (OIDC) library can execute this action. Check the previous guides for information on what you could use.
The Authorization Service Backend redirects them to the Authorization Service Frontend login page.
The page URL contains a loginChallenge parameter that keeps track of the login attempt.
Besides that, the URL can also include a forceFreshAuth parameter.
As the name suggests, this should force the login UI to be visible even though the user has an existing valid session.
This guide shows you how to handle this.
The Authorization Service Frontend renders the login UI and the user performs the login action.
The login UI should render based on instructions that are specific to each authentication method which you are using.
The additional thing that you have to do here is to consider the forceFreshAuth parameter.
The Authorization Service Frontend redirects the user back to the Authorization Service Backend
After the user submits the login form, you need to redirect them to a specific route that sends them to the original application. From here, the authentication flow completes.
Let’s see how you can actually implement this UI.
4.1 Configure the redirection URLs
As it has hinted in the previous section, the Authorization Service Backend sends the user to different pages from the Authorization Service Frontend, based on the action that needs execution.
The default values for these routes are:
- The login page maps to
<YOUR_WEBSITE_DOMAIN>/auth(this is also the place where a user ends up after logout) - The token refresh page maps to
<YOUR_WEBSITE_DOMAIN>/auth/try-refresh - The logout page maps to
<YOUR_WEBSITE_DOMAIN>/auth/logout
If you want to change these routes, you need to add a custom override.
import OAuth2Provider from "supertokens-node/recipe/oauth2provider";

OAuth2Provider.init({
  override: {
    functions: (originalFunctions) => ({
      ...originalFunctions,
      getFrontendRedirectionURL: async (input) => {
        const websiteDomain = "<YOUR_WEBSITE_DOMAIN>";
        const websiteBasePath = "/auth";

        if (input.type === "login") {
          const queryParams = new URLSearchParams({
            loginChallenge: input.loginChallenge,
          });
          if (input.hint !== undefined) {
            queryParams.set("hint", input.hint);
          }
          if (input.tenantId !== undefined) {
            queryParams.set("tenantId", input.tenantId);
          }
          if (input.forceFreshAuth) {
            queryParams.set("forceFreshAuth", "true");
          }

          return `<YOUR_WEBSITE_DOMAIN>/auth?${queryParams.toString()}`;
        } else if (input.type === "try-refresh") {
          return `<YOUR_WEBSITE_DOMAIN>/auth/try-refresh?loginChallenge=${input.loginChallenge}`;
        } else if (input.type === "post-logout-fallback") {
          return `<YOUR_WEBSITE_DOMAIN>/auth`;
        } else if (input.type === "logout-confirmation") {
          return `<YOUR_WEBSITE_DOMAIN>/auth/oauth/logout?logoutChallenge=${input.logoutChallenge}`;
        }

        return `<YOUR_WEBSITE_DOMAIN>/auth`;
      },
    }),
  },
});
4.2 Handle the forceFreshAuth parameter
Sometimes, even though there is an existing valid session in the Authorization Service Frontend, the requesting Client might force a new login attempt.
The forceFreshAuth parameter shows this.
When the login page renders, you also need to check for this parameter. You are doing this to know if you need to show the login UI.
Here is an example of how you can evaluate this case.
import Session from "supertokens-web-js/recipe/session";

async function shouldLogin() {
  const urlParams = new URLSearchParams(window.location.search);
  const forceFreshAuth = urlParams.get("forceFreshAuth") as string;
  if (forceFreshAuth === "true") return true;

  return !(await Session.doesSessionExist());
}4.3 Complete the login attempt
After the user submits the login form, you need to redirect them to a specific route to complete the OAuth 2.0 flow.
The following code sample shows you how to determine which URL to use.
import OAuth2Provider from "supertokens-web-js/recipe/oauth2provider";

async function getInitialRedirectionURL() {
  const urlParams = new URLSearchParams(window.location.search);
  const loginChallenge = urlParams.get("loginChallenge") as string;
  const redirectionResponse = await OAuth2Provider.getRedirectURLToContinueOAuthFlow({ loginChallenge });
  if (redirectionResponse.status === "OK") {
    return redirectionResponse.frontendRedirectTo;
  }
}
4.4 Add the token refresh page
To have support for token refreshing, you need to add a new page to your application. The path should correspond to the one outlined during the first step.
When the user ends up on this page, you need to use the Session recipe to perform the refresh action.
Then they need redirection to a page from your application.
Here’s a code sample that shows you how to do this.
import OAuth2Provider from "supertokens-web-js/recipe/oauth2provider";
import Session from "supertokens-web-js/recipe/session";

async function refreshToken() {
  await Session.attemptRefreshingSession();
  const urlParams = new URLSearchParams(window.location.search);
  const loginChallenge = urlParams.get("loginChallenge") as string;
  const redirectionResponse = await OAuth2Provider.getRedirectURLToContinueOAuthFlow({ loginChallenge });
  if (redirectionResponse.status === "OK") {
    window.location.href = redirectionResponse.frontendRedirectTo;
  }
}
4.5 Add the logout page
You need to add a logout page that users access when they want to end their session. The path should correspond to the one outlined during the first step.
The logout action should first ask the user for confirmation. If the confirmation passes, then you can call the recipe function. Based on the final response you can redirect the user to the provided redirection URL.
import OAuth2Provider from "supertokens-web-js/recipe/oauth2provider";

async function logout() {
  const confirmation = confirm("Are you sure that you want to log out?");
  if (!confirmation) return;

  const urlParams = new URLSearchParams(window.location.search);
  const logoutChallenge = urlParams.get("logoutChallenge") as string;
  const redirectResponse = await OAuth2Provider.logOut({ logoutChallenge });
  window.location.href = redirectResponse.frontendRedirectTo;
}
5. Update the login flow in your frontend applications
Use an OAuth 2.0/OIDC library that supports authorization code with PKCE. For every login:
- Generate a fresh high-entropy
stateand PKCE verifier; persist them only for the initiating browser transaction. - Send the derived S256 code challenge in the authorization request.
- On callback, verify
stateexactly before exchanging the code with the verifier. If requestingopenid, also generate and validatenonceand validate the ID token. - Keep access and refresh tokens in memory where possible. Do not place them in
localStorage, browser-readable cookies, or URLs. A backend-for-frontend that stores tokens server-side and issues an opaqueHttpOnly,Secure, appropriatelySameSitesession cookie offers stronger protection against token theft.
You can use the react-oidc-context library. Follow the instructions from the library’s page. Identify the configuration parameters based on the response received on step 2, when creating the OAuth2 Client.
authoritycorresponds to the endpoint of the Authorization Service<YOUR_API_DOMAIN>/authclient_idcorresponds toclientIdredirect_uricorresponds to a value fromredirectUrisscopecorresponds directly to the space-separatedscopevalue- Set
response_typeto"code". The library uses S256 PKCE for code flow and generates and validatesstate(andnoncewhen using OIDC). If you are using a multi-tenant setup, you also need to specify thetenantIdparameter in the authorization URL. To do this, set theextraQueryParamsproperty with a specific value that should look like this:{ tenant_id: "<TENANT_ID>" }.
You can use the angular-oauth2-oidc library. Follow the instructions described in the GitHub repository. Identify the configuration parameters based on the response received on step 2, when creating the OAuth2 Client.
issuercorresponds to the endpoint of the Authorization Service<YOUR_API_DOMAIN>/authclientIdcorresponds toclientIdredirectUricorresponds to a value fromredirectUrisscopecorresponds directly to the space-separatedscopevalue- Set
responseTypeto"code". The library uses S256 PKCE for code flow and generates and validatesstate(andnoncewhen using OIDC). If you are using a multi-tenant setup, you also need to specify thetenantIdparameter in the authorization URL. To do this, setcustomQueryParamsto{ tenant_id: "<TENANT_ID>" }.
You can use the oidc-client-ts library. Follow the instructions described in the GitHub repository. Identify the configuration parameters based on the response received on step 2, when creating the OAuth2 Client.
authoritycorresponds to the endpoint of the Authorization Service<YOUR_API_DOMAIN>/authclient_idcorresponds toclientIdredirect_uricorresponds to a value fromredirectUrisscopecorresponds directly to the space-separatedscopevalue- Set
response_typeto"code". The library uses S256 PKCE for code flow and generates and validatesstate(andnoncewhen using OIDC). If you are using a multi-tenant setup, you also need to specify thetenantIdparameter in the authorization URL. To do this, set theextraQueryParamsproperty with a specific value that should look like this:{ tenant_id: "<TENANT_ID>" }.
6. Test the new authentication flow
With everything set up, you can test your login flow. Use the setup created in the previous step to check if the authentication flow completes without any issues.