Reuse website login for desktop and mobile apps
Implement web authentication for desktop and mobile apps using OAuth 2.0.
Overview
This pattern is useful if you want to have the same web authentication experience for your desktop and mobile apps. The implementation allows you to save development time but keep in mind that it does not involve a native authentication interface. Users get directed to a separate browser page where they complete the authentication flow and then return to your application.
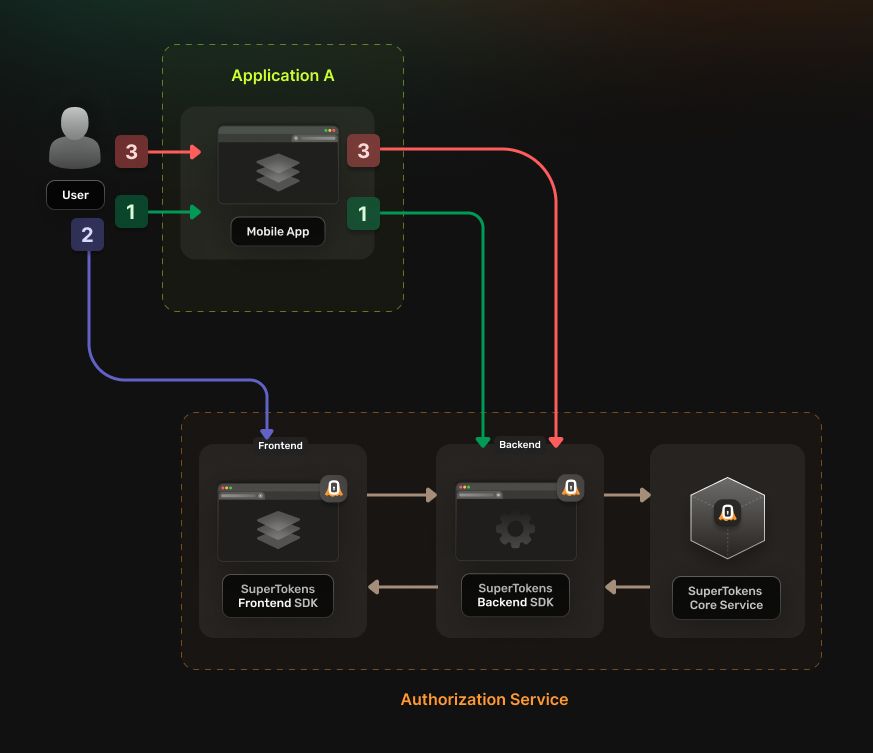
The authentication flow works in the following way:
User accesses the native application
- The user gets redirected to Authorization Service authentication URL.
- The Authorization Service redirects the user to the login UI
User completes the login attempt
- The Authorization Service redirects the user to the registered callback URL.
- Prefer an OS-claimed HTTPS universal link or app link. If you must use a custom scheme, follow the platform guidance for preventing other apps from claiming it.
The application completes the authorization code flow
- The application verifies
state, then exchanges the code with the original PKCE verifier. - It stores returned tokens only in platform-protected secure storage.
Before you start
Steps
1. Enable the Unified Login feature
Go to the SuperTokens.com SaaS Dashboard, select the relevant Managed deployment, and open Features. Enable Unified Login. Changes are saved automatically.
2. Create the OAuth2 Clients
For each native application, create a separate OAuth2 client.
Call the SuperTokens Core API from a trusted administrative environment. Native applications are public clients: tokenEndpointAuthMethod must be none, and the application must never contain or receive a client secret. Use authorization code with S256 PKCE.
curl --location --request POST '<CORE_API_ENDPOINT>/recipe/oauth/clients' \
     --header 'api-key: <YOUR_API_KEY>' \
     --header 'Content-Type: application/json; charset=utf-8' \
     --data '
    {
      "clientName": "<YOUR_CLIENT_NAME>",
      "responseTypes": ["code"],
      "grantTypes": ["authorization_code", "refresh_token"],
      "tokenEndpointAuthMethod": "none",
      "scope": "offline_access <custom_scope_1> <custom_scope_2>",
      "redirectUris": ["https://app.example.com/oauth/callback"]
    }
'
const BASE_URL = "<CORE_API_ENDPOINT>";
const API_KEY = "<YOUR_API_KEY>";
const url = `${BASE_URL}/recipe/oauth/clients`;
const options = {
method: "POST",
headers: {
"api-key": API_KEY,
"Content-Type": "application/json; charset=utf-8",
},
body: JSON.stringify({
clientName: "<YOUR_CLIENT_NAME>",
responseTypes: ["code"],
grantTypes: ["authorization_code", "refresh_token"],
tokenEndpointAuthMethod: "none",
scope: "offline_access <custom_scope_1> <custom_scope_2>",
redirectUris: ["https://app.example.com/oauth/callback"],
}),
};
fetch(url, options)
.then((response) => response.json())
.then((json) => console.log(json))
.catch((err) => console.error(err));
import (
  "fmt"
  "net/http"
  "strings"
  "io"
)

func main() {
  baseUrl := "<CORE_API_ENDPOINT>"
  apiKey := "<YOUR_API_KEY>"
  url := fmt.Sprintf("%s/recipe/oauth/clients", baseUrl)
  payload := `{
    "clientName": "<YOUR_CLIENT_NAME>",
    "responseTypes": ["code"],
    "grantTypes": ["authorization_code", "refresh_token"],
    "tokenEndpointAuthMethod": "none",
    "scope": "offline_access <custom_scope_1> <custom_scope_2>",
    "redirectUris": ["https://app.example.com/oauth/callback"]
  }`

  req, _ := http.NewRequest("POST", url, strings.NewReader(payload))

  req.Header.Add("accept", "application/json")
  req.Header.Add("api-key", apiKey)
  req.Header.Add("content-type", "application/json")

  res, _ := http.DefaultClient.Do(req)

  defer res.Body.Close()
  body, _ := io.ReadAll(res.Body)

  fmt.Println(string(body))
}
import requests
from typing import Dict, Any
BASE_URL = "<CORE_API_ENDPOINT>"
API_KEY = "<YOUR_API_KEY>"
url = f"{BASE_URL}/recipe/oauth/clients"
payload: Dict[str, Any] ={
"clientName": "<YOUR_CLIENT_NAME>",
"responseTypes": ["code"],
"grantTypes": ["authorization_code", "refresh_token"],
"tokenEndpointAuthMethod": "none",
"scope": "offline_access <custom_scope_1> <custom_scope_2>",
"redirectUris": ["https://app.example.com/oauth/callback"]
}
headers = {
"api-key": API_KEY,
"Content-Type": "application/json",
}
response = requests.post(url, json=payload, headers=headers)
print(response.json())Creates an OAuth2 client
Authorization: Set the api-key header to the value of your SuperTokens Core API key.
Request
Body Schema
| Name | Type | Description | Required | Default Value |
|---|---|---|---|---|
clientName |
string |
A human-readable name of the client used for identification. | Yes | - |
grantTypes |
array of GrantType |
The grant types that the Client uses. | Yes | - |
redirectUris |
array of string |
Exact redirect URIs registered for the client. Wildcards are not supported. | Yes | - |
scope |
string |
String containing a space-separated list of scope values (as described in Section 3.3 of OAuth 2.0 [RFC6749]) that the client can use when requesting access tokens. Include the offline_access scope to exchange OAuth2 Refresh Tokens for OAuth2 Access Tokens |
No | “” |
responseTypes |
array of ResponseType |
The types of responses your client expects from the Authorization Server | No | - |
tokenEndpointAuthMethod |
enum("client_secret_basic", "client_secret_post", "private_key_jwt", "none") |
The requested client authentication method | No | client_secret_basic |
authorizationCodeGrantAccessTokenLifespan |
Time Duration |
OAuth2 Access Token lifespan when using the Authorization Code grant flow. | No | "1h" |
authorizationCodeGrantIdTokenLifespan |
Time Duration |
OAuth2 ID Token lifespan when using the Authorization Code grant flow. | No | "1h" |
authorizationCodeGrantRefreshTokenLifespan |
Time Duration |
OAuth2 Refresh Token lifespan when using the Authorization Code grant flow. | If refreshTokenGrantRefreshTokenLifespan is also set |
"30d" |
refreshTokenGrantRefreshTokenLifespan |
Time Duration |
OAuth2 Refresh Token lifespan when using the Refresh Token grant flow. Must match authorizationCodeGrantRefreshTokenLifespan. |
If authorizationCodeGrantRefreshTokenLifespan is also set |
"30d" |
clientCredentialsGrantAccessTokenLifespan |
Time Duration |
OAuth2 Access Token lifespan when using the Client Credentials grant flow. | No | "1h" |
enableRefreshTokenRotation |
boolean |
Indicates that the refresh token is a one-time use. Set it to false to disable refresh token rotation. |
No | true |
GrantType
authorization_code: allows exchanging the Authorization Code for an OAuth2 Access Token.refresh_token: allows exchanging the OAuth2 Refresh Token for an OAuth2 Access Token.client_credentials: allows the client to directly request an OAuth2 Access Token by authenticating itself with the Authorization Server using its own client credentials.
TokenEndpointAuthMethod
client_secret_basic: uses the HTTP Basic Authentication scheme to authenticate the client.client_secret_post: uses the HTTPPOSTAuthentication scheme to authenticate the client.private_key_jwt: uses JSON Web Tokens (JWT) to authenticate the client.none: indicates that the process of obtaining an OAuth2 Access Token does not use the client secret. Used for public clients (native apps or mobile apps).
ResponseType
code: Indicates that the Client receives an Authorization Code that it exchanges for an OAuth2 Access Token.id_token: Indicates that the Client expects an ID Token.
Time Duration
A string value that signifies time duration in milliseconds, seconds, minutes, or hours: "2000ms", "60s", "30m", "1h".
Example
curl -X POST <CORE_API_ENDPOINT>/recipe/oauth/clients \
  -H "Content-Type: application/json" \
  -H "api-key: <YOUR_API_KEY>" \
  -d '{
      "clientName": "<YOUR_CLIENT_NAME>",
      "responseTypes": ["code"],
      "grantTypes": ["authorization_code", "refresh_token"],
      "tokenEndpointAuthMethod": "none",
      "scope": "offline_access <custom_scope_1> <custom_scope_2>",
      "redirectUris": ["https://app.example.com/oauth/callback"]
    }'
Response
200
The client has been successfully created.
Relevant response fields
The response includes the persisted client configuration, including the fields below.
| Property | Type | Description |
|---|---|---|
clientName |
string |
The name of the client. |
clientId |
string |
Unique identifier for the client. |
clientSecret |
string |
Client secret for a confidential client. Omitted for a public client. Treat it as a credential and keep it on a trusted backend. |
redirectUris |
array of string |
The URLs used for redirection. |
audience |
array of string |
Value used to identify for whom a token is issued. The created client can generate access token only for the specified audiences. |
scope |
string |
A space-separated string of scopes that the client can request. |
responseTypes |
array of string |
Registered response types. |
grantTypes |
array of string |
Registered grant types. |
tokenEndpointAuthMethod |
string |
Token endpoint authentication method. |
enableRefreshTokenRotation |
boolean |
Whether refresh token rotation is enabled. |
Example
{
  "clientName": "<YOUR_CLIENT_NAME>",
  "clientId": "<CLIENT_ID>",
  "tokenEndpointAuthMethod": "none",
  "redirectUris": ["https://app.example.com/oauth/callback"],
  "audience": ["<YOUR_APPLICATION_DOMAIN>"],
  "scope": "offline_access <custom_scope_1> <custom_scope_2>"
}Based on the client creation process, you can infer two additional values that you need later on:
authorizeUrlcorresponds to<YOUR_API_DOMAIN>/auth/oauth/authtokenFetchUrlcorresponds to<YOUR_API_DOMAIN>/auth/oauth/token
3. Configure the Authorization Service
Check one of the previous guides that show you how to set up the Authorization Service and then return to this page. Choose the tutorial based on whether you use multiple backend services or not:
4. Update the login flow in your applications
In each of your individual applications, you need to set up logic for handling the OAuth 2.0 authentication flow.
Use a maintained native OAuth 2.0/OIDC library that uses the system browser and authorization code with S256 PKCE. For every request, let the library generate a fresh PKCE verifier and high-entropy state; verify state before code exchange. If you request openid, also generate and validate nonce and validate the ID token’s signature, issuer, audience, expiry, and nonce. Never use an embedded web view.
Register an exact callback URI. Prefer an OS-claimed HTTPS universal link or app link; use a custom scheme only when the platform’s interception protections are configured. Store access and refresh tokens in Keychain, Android Keystore-backed storage, or the platform equivalent. Never put tokens in logs, URLs, plain-text preferences, or application bundles.
You can use the react-native-app-auth library. Follow the instructions to set up your application.
Use authorization code with S256 PKCE and validate state. You can identify the configuration parameters from the response in step 2.
issuercorresponds to the endpoint of the Authorization Service<YOUR_API_DOMAIN>/authclientIdcorresponds toclientIdredirectUrlcorresponds to a value fromredirectUrisscopesis the space-separatedscopevalue split into a list
You also need to set the additionalParameters property with the following values:
max_age: 0This forces a new authentication flow once the user ends up on the Authorization Service frontend.tenant_id: <TENANT_ID>Optional, in case you are using a multi tenant setup. Set this to the actual tenant ID.
You can use the AppAuth-Android library. Follow the instructions to set up your application.
Use authorization code with S256 PKCE and validate state. You can identify the configuration parameters from the response in step 2.
For the AuthorizationServiceConfiguration, the parameters you need to provide are: authorizeUrl and tokenFetchUrl.
When calling the AuthorizationRequest.Builder function you can use clientId and a value from redirectUris to replace the example values.
You need to set additional query parameters by calling the setAdditionalParameters function on the AuthorizationRequest.Builder object:
max_age: 0This forces a new authentication flow once the user ends up on the Authorization Service frontend.tenant_id: <TENANT_ID>Optional, in case you are using a multi tenant setup. Set this to the actual tenant ID.
You can use the AppAuth-iOS library. Follow the instructions to set up your application.
Use authorization code with S256 PKCE and validate state. You can identify the configuration parameters from the response in step 2.
clientIdcorresponds toclientIdredirectUrlcorresponds to a value fromredirectUrisscopesis the space-separatedscopevalue split into a listauthorizationEndpointcorresponds toauthorizeUrltokenEndpointcorresponds totokenFetchUrl
You also need to set extra query parameters, when instantiating the OIDAuthorizationRequest object, with the following values:
max_age: 0This forces a new authentication flow once the user ends up on the Authorization Service frontend.tenant_id: <TENANT_ID>Optional, in case you are using a multi tenant setup. Set this to the actual tenant ID.
You can use the AppAuth library. Follow the instructions to set up your application.
Use authorization code with S256 PKCE and validate state. You can identify the configuration parameters from the response in step 2.
<client_id>corresponds toclientId<issuer>corresponds to the endpoint of the Authorization Service<YOUR_API_DOMAIN>/auth<redirect_url>corresponds to a value fromredirectUrisscopesis the space-separatedscopevalue split into a list
You also need to set the additionalParameters property with the following values:
max_age: 0This forces a new authentication flow once the user ends up on the Authorization Service frontend.tenant_id: <TENANT_ID>Optional, in case you are using a multi tenant setup. Set this to the actual tenant ID.
5. Test the new authentication flow
With everything set up, you can test your login flow. Use the setup created in the previous step to check if the authentication flow completes without any issues.